Easy Granny Square Balaclava: Free Beginner Pattern
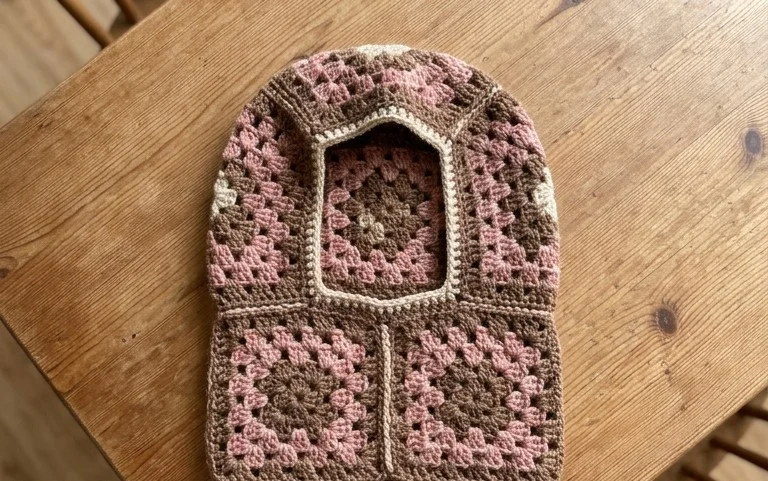
A crochet balaclava made from joined squares has a thick, cozy texture that keeps the wind off your face and neck during cold mornings. This hooded accessory sits comfortably against the skin, providing warmth without feeling too heavy or stiff. Beginners appreciate how the modular design allows you to focus on stitching one small piece at a time until the final assembly brings it all together. You will master the process of joining squares while managing stitch tension to ensure the finished piece remains flexible and soft. It serves as a practical addition to your winter gear or a thoughtful gift for friends.
Why You’ll Love This Pattern
The Classic Crochet Granny Square is the foundation of countless heritage projects, offering a repetitive, meditative rhythm that makes it ideal for building muscle memory. This pattern creates a balanced square with sharp corners and flat sides, preventing the dreaded curling or “bowl” effect that often plagues beginners. You can use this square as a standalone coaster or join multiple blocks together to construct blankets, tote bags, or garments. Because it relies on basic chains and double crochet clusters, it is a highly portable project that requires only a small amount of focus once the first two rounds are established.
I finally mastered the granny square with this guide. The instructions for the corner chains helped me keep my squares perfectly flat instead of wavy.
— Sarah, hobbyist crafter
Pattern Overview & Skill Level
- Skill Level: Beginner
- Approximate Time: 30 to 45 minutes per square
- Construction: Worked in rounds from the center outward, turning the work after each round to keep the square balanced
- Finished Dimensions: Approximately 5 inches by 5 inches using medium weight yarn and a 5.0 mm hook
Materials & Supplies Needed
- Yarn: Worsted weight (#4), 100% cotton or acrylic, approximately 20 yards per square. Cotton provides better stitch definition for beginners, while acrylic is softer for blankets.
- Hook Size: 5.0 mm (H-8)
- Notions: Tapestry needle for weaving in ends, scissors, and a measuring tape.
- Safe yarn substitutions: You may use DK weight (#3) yarn with a 4.0 mm hook for a smaller, delicate square, or bulky weight (#5) yarn with a 6.0 mm hook for a larger, faster-growing project. Note that changing yarn weight will significantly alter the final dimensions.
Stitch Guide & Abbreviations (US Terms)
- ch: Chain
- sl st: Slip stitch
- dc: Double crochet
- dc cluster: 3 double crochet stitches worked into the same space
- sp: Space (the gap created by ch-1 or ch-2)
- MR: Magic ring (or alternative: ch 4 and sl st to first ch to form a ring)
Step-by-Step Pattern Instructions
This pattern is worked in rounds. Always join with a slip stitch to the top of the beginning chain or the first stitch of the round as indicated.
Rnd 1: Start with a MR. Ch 3 (counts as first dc), work 2 dc into the ring. Ch 2, *3 dc into ring, ch 2; repeat from * twice more. Join with a sl st to the top of the starting ch-3. (12 dc, 4 ch-2 spaces)
Rnd 2: Sl st into the next dc, the next dc, and into the first ch-2 corner space. Ch 3, work 2 dc, ch 2, and 3 dc all into the same corner space. *Ch 1, skip 3 dc, (3 dc, ch 2, 3 dc) into the next ch-2 space; repeat from * twice more. Ch 1, join with a sl st to the top of the starting ch-3. (24 dc, 4 ch-1 spaces, 4 ch-2 spaces)
Rnd 3: Sl st into the next dc, the next dc, and into the corner ch-2 space. Ch 3, work 2 dc, ch 2, 3 dc into the same corner. *Ch 1, 3 dc into the next ch-1 side space, ch 1, (3 dc, ch 2, 3 dc) into the next ch-2 corner; repeat from * twice more. Ch 1, 3 dc into the last ch-1 side space, ch 1, join with a sl st to the top of the starting ch-3. (36 dc, 8 ch-1 spaces, 4 ch-2 spaces)
Rnd 4: Sl st into the next two dc and the corner space. Ch 3, work 2 dc, ch 2, 3 dc into the corner. *[Ch 1, 3 dc in next ch-1 space] twice. Ch 1, (3 dc, ch 2, 3 dc) in corner space; repeat from * twice more. [Ch 1, 3 dc in next ch-1 space] twice, ch 1, join with sl st to top of starting ch-3. (48 dc, 12 ch-1 spaces, 4 ch-2 spaces)
Finishing: Fasten off leaving a 6-inch tail. Pull the tail through the final loop and pull tight. Weave the end through the back of the stitches to secure.
Care & Washing Instructions
- Hand wash or machine wash on a delicate cycle in cool water (30°C/86°F) to prevent fiber damage.
- Lay the square flat on a clean towel to air dry, reshaping it into a perfect square while damp.
- Avoid using a tumble dryer, as high heat can shrink natural fibers and soften the structure of synthetic acrylic yarns.
Pro Tips & Common Mistakes to Avoid
Maintain consistent tension by holding the yarn taut but not tight; if your fingers cramp, you are likely gripping the hook too firmly. Always use a stitch marker in the top of your starting chain-3 to make the final join of each round much easier to locate. When weaving in ends, pass the needle through the center of the double crochet stitches on the reverse side of the work to ensure the tails remain hidden and secure. If you want a larger square, simply continue repeating the logic of Rnd 4: always place (3 dc, ch 2, 3 dc) in the corners and 3 dc in every ch-1 side space, adding one more 3-dc cluster per side for each subsequent round.
Frequently Asked Questions
Can I use a different hook size than recommended?
Yes, you can use a smaller hook to create a denser, stiffer fabric or a larger hook for a drapier, looser square. Always adjust your tension accordingly to ensure the stitches do not have large, unsightly gaps.
Why is my square not laying flat?
If your square is wavy, you likely have too many stitches or chains on the sides. If the square is pulling into a bowl shape, you likely need to increase the number of chain stitches in the corners or add more clusters to the side spaces to provide enough slack.
How do I join these squares together?
You can use a whip stitch or a single crochet join to connect your finished squares. The single crochet join creates a raised, decorative ridge, while the whip stitch remains nearly invisible when worked through the back loops only.
Is this pattern suitable for selling the finished items?
You are welcome to sell physical items made from this pattern, provided you credit the design. Please do not sell or redistribute the written instructions themselves, as the pattern remains the intellectual property of the designer.
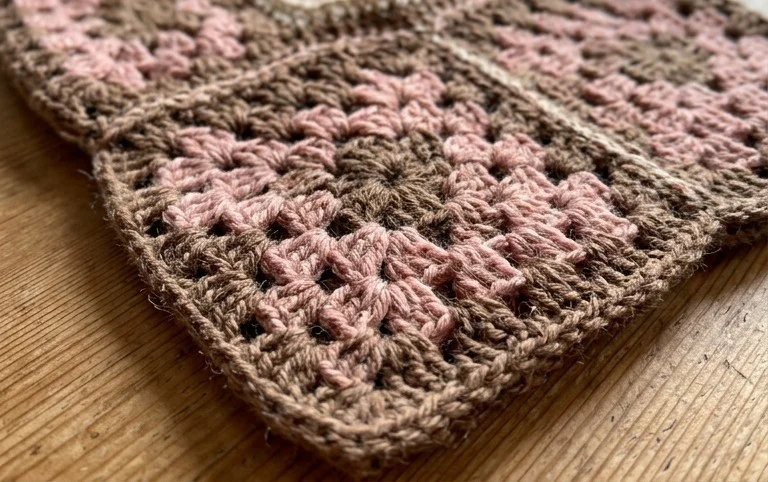
Your finished hood is a functional piece of art that keeps you warm during snowy walks and windy days. You can experiment with using wool blends instead of cotton if you prefer extra insulation or want a slightly drape-heavy fit for your next attempt. Share a photo of your color combinations on social media so others can see your unique choices. Check the archives on our blog if you are ready to find more patterns for hats, scarves, and mittens to pair with your new headwear.